GRAPHICS & DECAL INSTALLATION
Graphics and decal installation guides
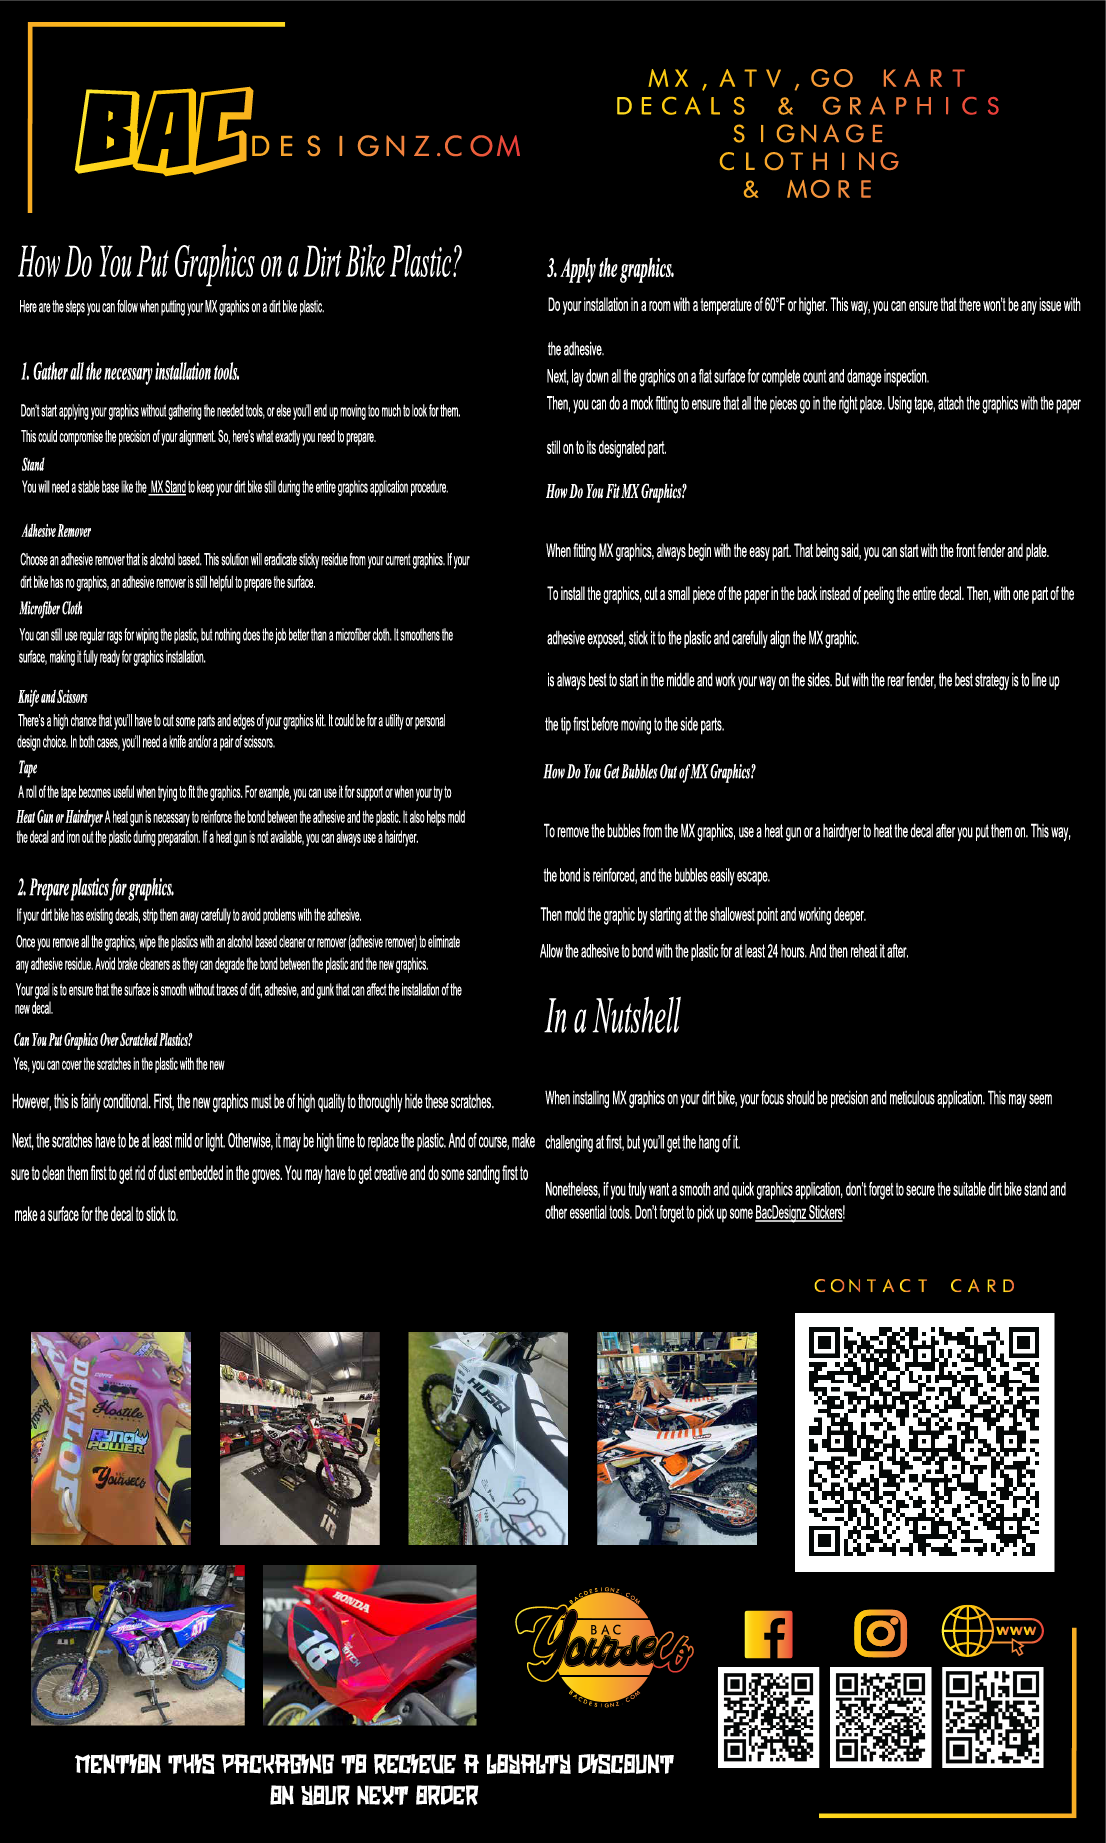
How Do You Put
Graphics on a Dirt Bike Plastic?
Here are the steps
you can follow when putting your MX graphics on a dirt bike plastic.
1. Gather all the necessary installation tools. Don’t start
applying your graphics without gathering the needed tools, or else you’ll end
up moving too much to look for them. This could compromise the precision of
your alignment. So, here’s what exactly you need to prepare.
Stand You will need a stable base like
the MX Stand to keep your
dirt bike still during the entire graphics application procedure.
Adhesive Remover Choose an adhesive
remover that is alcohol-based. This solution will eradicate sticky residue from
your current graphics. If your dirt bike has no graphics, an adhesive remover
is still helpful to prepare the surface.
Microfiber Cloth You can still use
regular rags for wiping the plastic, but nothing does the job better than a
microfiber cloth. It smoothens the surface, making it fully ready for graphics
installation.
Knife and Scissors There’s a high
chance that you’ll have to cut some parts and edges of your graphics kit. It
could be for a utility or personal design choice. In both cases, you’ll need a
knife and/or a pair of scissors.
Tape A roll of the tape becomes useful when trying to fit the graphics. For
example, you can use it for support or when your try to draw estimates with the
alignment.
Heat Gun or Hairdryer A heat gun is necessary to reinforce
the bond between the adhesive and the plastic. It also helps mold the decal and
iron out the plastic during preparation. If a heat gun is not available, you
can always use a hairdryer.
2. Prepare plastics for graphics.
If your dirt bike
has existing decals, strip them away carefully to avoid problems with the adhesive.Once
you remove all the graphics, wipe the plastics with an alcohol-based cleaner or
remover (adhesive remover) to eliminate any adhesive residue. Avoid brake
cleaners as they can degrade the bond between the plastic and the new graphics.Your
goal is to ensure that the surface is smooth without traces of dirt, adhesive,
and gunk that can affect the installation of the new decal.
Can You Put Graphics Over Scratched Plastics? Yes, you can cover
the scratches in the plastic with the new graphics. However, this is fairly
conditional. First, the new graphics must be of high quality to thoroughly hide
these scratches. Next, the scratches have to be at least mild or light. Otherwise, it may
be high time to replace the plastic. And of course, make sure to clean them
first to get rid of dust embedded in the groves. You may have to get creative
and do some sanding first to make a surface for the decal to stick to.
3. Apply the graphics. Do your
installation in a room with a temperature of 60°F or higher. This way, you can
ensure that there won’t be any issue with the adhesive. Next, lay down all
the graphics on a flat surface for complete count and damage inspection. Then, you can do a
mock fitting to ensure that all the pieces go in the right place. Using tape,
attach the graphics with the paper still on to its designated part.
How Do You Fit MX Graphics? When fitting MX
graphics, always begin with the easy part. That being said, you can start with
the front fender and plate. To install the
graphics, cut a small piece of the paper in the back instead of peeling the
entire decal. Then, with one part of the adhesive exposed, stick it to the
plastic and carefully align the MX graphic. It is always best
to start in the middle and work your way on the sides. But with the rear
fender, the best strategy is to line up the tip first before moving to the side
parts.
How Do You Get Bubbles Out of MX Graphics? To remove the
bubbles from the MX graphics, use a heat gun or a hairdryer to heat the decal
after you put them on. This way, the bond is reinforced, and the bubbles easily
escape. Then mold the graphic by starting at the shallowest point and working
deeper. Allow the adhesive to bond with the plastic for at least 24 hours. And
then reheat it after.
In a Nutshell When installing MX
graphics on your dirt bike, your focus should be precision and meticulous
application. This may seem challenging at first, but you’ll get the hang of it..None the less, if you truly want a smooth and quick
graphics application, don’t forget to secure the suitable dirt bike
stand and other essential tools. Don’t forget
to pick up some BacDesignz Stickers!
Jersy prints and heat transfer products

Jersy prints and heat transfer products
How to Use a Heat Press Machine Step by Step to Print Your Own Shirts
Settings required are 150 degrees hard press for 5-10 seconds and let your print cool down before removing application tape, we recomend using a heat press for the best outcome as it applies even pressure
1 Settings
Turn on your heat press and adjust the temperature, time, and pressure settings according to the type of transfer material and fabric you're using. , reach out to us for personalized help.
2. Arrange and Pre-HEAT Your Shirt
Place your T-shirt flat on the lower plate of the heat press, ensuring it’s wrinkle-free. To prepare the fabric, pre-press the shirt for a few seconds to remove any moisture and smooth out the surface, ensuring better adhesion of your design.
3. Position Your Transfer on the Shirt
Carefully align your design on the T-shirt, making sure it’s centered. Place the transfer paper with the design face-down on the fabric. Double-check that your design is properly positioned to avoid any mistakes.
4. Apply Heat and Pressure
Lower the top plate of your heat press and allow the set temperature, time, and pressure to transfer your design onto the T-shirt. Be sure to follow the recommended pressing time to achieve optimal results.
5. Peel the Transfer Paper or Carrier Sheet
Once the heat press timer goes off, carefully open the machine. Gently peel off the transfer paper or carrier sheet according to the instructions, which will indicate whether to peel hot or cold for the best outcome.